This document provides instructions on setting up a new Globus endpoint, focusing on first-time creation. This guide assumes that no subscription is used, so it will only focus on using Globus to create a file collection using a Linux file system.
Server Requirements
- One of the following Linux distributions (This guide will focus on Alma/RockyLinux)
- CentOS 7
- Rocky Linux 8
- Alma Linux 8
- Springdale Linux 8
- Oracle Linux 8
- Debian 10 or 11
- Fedora 34 or 35
- RHEL 7 or 8
- Ubuntu 18.04 LTS, 20.04 LTS, 21.04 or 21.10
- An account with administrator access
- A running network time-synchronizing service like
ntpd - Unicode language local must be enable on the server
- Run the command
localectlon Alma/Rocky to see the locale settings; which should been_US.UTF-8
- Run the command
- Internet access
- If behind a firewall, the following port rules must be opened to/from any other server
- 50000-51000
- 443
- If NAT is being used
- Ensure the ports prior are mapped from the server’s public IP on the NAT to the server’s internal IP
- Ensure systems in the local network can connect to the server using its public IP address
- A Globus account
Installing Globus Connect Server
- Run the following commands to configure the package system on the server to install the software.
sudo dnf install https://dl.fedoraproject.org/pub/epel/epel-release-latest-8.noarch.rpm
sudo dnf install https://downloads.globus.org/globus-connect-server/stable/installers/repo/rpm/globus-repo-latest.noarch.rpm
sudo dnf install globus-connect-server54
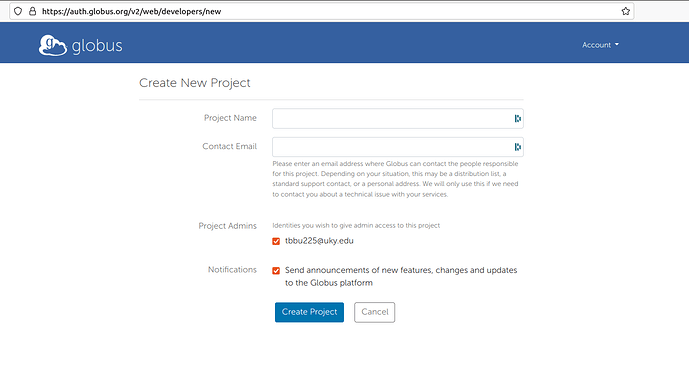
- Create the Globus Endpoint via the Globus Developer Console (https://developers.globus.org/)
a. Click " Register a new Globus Connect Server v5. "
b. If this is your first project, you will automatically be taken to the " Create New Project " page; otherwise, Click " Create New Project " at the top of the project screen. Fill out the form provided.
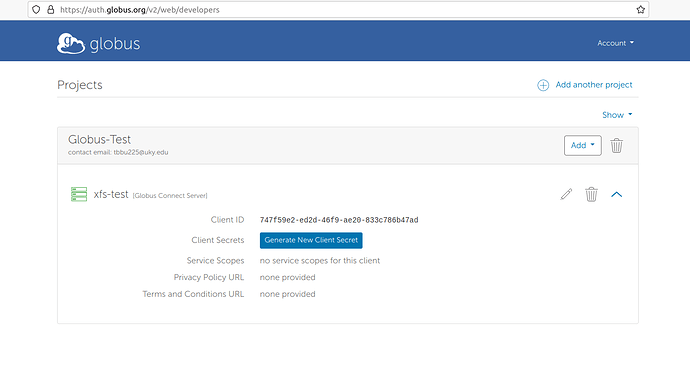
- From the Add menu, click on " Add new Globus Connect Server " and fill out the form.
a. This name will be used to identify the endpoint when they access it for the first time.
- Click on the " Generate New Client Secret " and fill out the form to get a secret key for the server.
a. The client ID and secret will be used in future steps to connect the physical server to the endpoint.
- Back to the server, run the following command
globus-connect-server endpoint setup --organization <org-name> --client-id <id> --owner <globus-user-email> --contact-email <email> <endpoint-name>
a. Running this will ask for the secret generated in the previous step and then ask for a prompt for the Terms of Service; enter “y” and you should receive something like the following output
b. The endpoint name and the client id are from the steps 3 and 4.
c. The owner email should be someone with a Globus account that can manage the endpoint.
d. You will also receive a file deployment-key.json . This file will be needed when setting up additional nodes to the endpoint
- Run the following command to start the Globus services on the node
sudo globus-connect-server node setup --client-id <client-id>
- Run the following command to login and enable further configuration options
globus-connect-server login localhost
a. It will give you a URL that you need to go to and login via Globus to receive an authentication token. Enter the token in the command line to complete login.
Post-Install Actions (Connect Server - Optional)
- After logging in, you can run the following command to display configuration status about the endpoint
globus-connect-server endpoint show
- If you have a Globus subscription and the account you use to login is a subscription manager, you can set the end point as managed by running the following command
globus-connect-server endpoint set-subscription-id DEFAULT
At this point, the server is connected to the endpoint as a Data Transfer Node. However, to access data you still need to setup a storage gateway and collection on the server.
Create Storage Gateway
The storage gateway defines the policies for user authentication and identity mapping for the node. Creating a storage gateway only requires running the following command.
globus-connect-server storage-gateway create posix <gateway> <options>
the posix is the common collection type to use and can be used by anyone using Globus without a subscription. If you have subscription, you can use other connector types like google-drive or s3 . The next sections detail some of the common options added to this command when creating a gateway.
Authentication Requirements
--domain <domain> # Use the domain of the provided Globus identity provider as the default --authentication-timeout-mins <minutes> # Define user timeout (in minutes) before they need to re-authenticate --high-assurance # Set that server is handling high-assurance data and enforces timeout on a per-application session basis
Identity Mapping
By default, the server will map a provided identity to a username on the server. For example, if a user authenticates with the identity john@example.org , then they will be associated to the john user account on the server. To provide you own, use one of the following options.
--identity-mapping external: <command> # Run command to get identity --identity-mapping file: <json> # Provide a JSON file to map identities --identity-mapping <json>
Below is an example of a JSON file used the map identities from multiple sources.
{ "DATA_TYPE": "expression_identity_mapping#1.0.0", "mappings": [ { "source": "{username}", "match": "(.*)@example\\.org", "output": "{0}" }, { "source": "{email}", "match": "user@example\\.edu", "output": "example_edu_user", "ignore_case": true }, { "source": "{email}", "match": "user@example\\.com", "output": "example_com_user", "ignore_case": true } ] }
Data Access Policies
Use the --restrict-paths file: <json> option to provide a JSON file which defines read/write permission on certain paths.
The example file below limits users’ access to their home directories.
{ "DATA_TYPE": "path_restrictions#1.0.0", "read_write": ["$HOME"], "none": ["/"] }
User Access Policies
Use the --user-allow <username> and --user-deny <username> options to control which accounts on the server can access the gateway. For example, use --user-deny root to prevent access to root on the gateway, even if someone were to have authenticated with a root@example.org identity.
Below is the example of a full invocation of the command to create a new gateway.
globus-connect-server storage-gateway create posix "Example Gateway" \ --domain example.org \ --authentication-timeout-mins $((60 * 24 * 30)) \ --restrict-paths file:path-restrictions.json \ --user-deny root Storage Gateway ID: 7187a9a0-68e4-48ea-b3b9-7fd06630f8ab
If successful, the command will generate a storage gateway ID, which will be used once you create a collection.
Create a Mapped Collection
To create a mapped collection and make data accessible via Globus, run the following command
globus-connect-server collection create <storage_gateway_id> <base-path> <collection-name> <options>
The most common options are usually to set metadata about the collection, to make it easier for users to find the collection on Globus. These options are listed below.
--keywords string, string, ... # Comma separated list of keywords to help searches for the collection
--department DEPARTMENT
--organization ORGANIZATION
--contact-email EMAIL
--contact-info INFO
--info-link URL
--description STRING
--user-message MESSAGE
--user-message-link URL
You can also allow for guest collections, which enable users to share data with collaborators in a managed way. The following options control guest collections for a created mapped collection.
--allow-guest-collections
--sharing-restrict-paths file:FILE # The file is the same JSON format used when creating a storage gateway
--sharing-user-allow USER
The following is an example of a full invocation of the command to create a mapped collection.
globus-connect-server collection create \ 7187a9a0-68e4-48ea-b3b9-7fd06630f8ab \ /path/to/collection_files/ \ "POSIX example.org files" \ --organization 'Example organization' \ --contact-email support@example.org \ --info-link https://example.org/storage/info \ --description "Collection of home directories for the example.org's users" \ --keywords example.org,home \ --allow-guest-collections \ --sharing-restrict-paths file:sharing_restrictions.json \ --sharing-user-allow alice --sharing-user-allow bob \ --user-message "Tape storage: Do not upload small files" \ --user-message-link https://example.org/tape-policy Collection ID: 56c3dff0-d827-4f11-91f3-b0704c53aa4c
Firewall Rules
In order for the system to fully work, make sure any firewalls are configured with the following port rules to allow Globus traffic through.
| Port # | Protocol | Direction | Destination |
|---|---|---|---|
| 2223 | TCP | Out | 54.237.254.192/29 |
| 50000-51000 | TCP | Out | Any |
| 32768-655535 | UDP | Out | Any |
| 19302 | UDP | Out | Any |
| 443 | TCP | Out | auth.globus.org, 54.237.254.192/29, downloads.globus.org, app.globus.org |
Confirming Setup
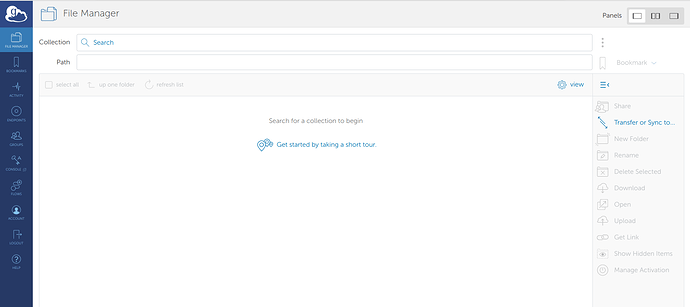
- Go to https://app.globus.org/ and log in to your Globus account. If not already there, navigate to the File Manager tag on the left sidebar.
- Type the name of the collection into the search bar and click on the matching name to access the collection. Note that to the user, “/” will be the path you provided when creating the collection.
For more information, visit the links below:
- Globus Install Guide (Initial server and endpoint setup): Globus Connect Server v5 Installation Guide
- Globus Data Access Guide (Storage Gateway and Collection setup): Globus Connect Server v5 Data Access Admin Guide


